Projects
Managing projects in Squadbase
What is a Project?
Projects are the central feature for application development in Squadbase. They provide unified management for code, dashboard publishing, access analytics, and log monitoring.
Key Features
- Unified Management: Centralized control over code, publishing, logs, and analytics
- Space Integration: Every project belongs to a Space, sharing access with space members
- Multiple Creation Methods: Import via Connectors or from GitHub repositories
- Feedback Collection: Built-in comment and feedback functionality for team collaboration
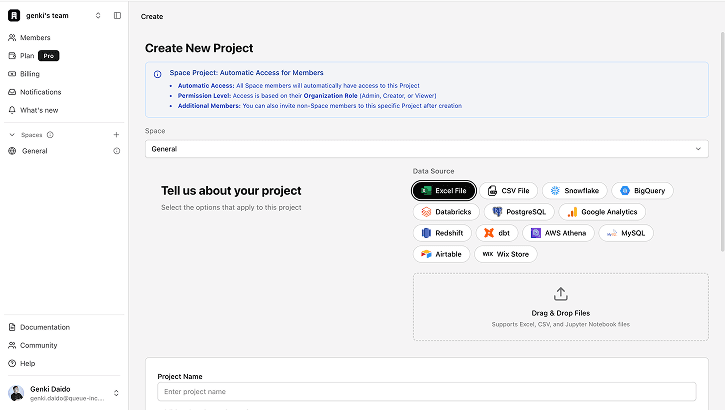
Creating a Project
All projects must belong to a Space. Space members automatically gain access to all projects within that space.
Click "Create Project" in the Space Details Screen
Select a space from the space list, then click the "+ Create Project" button in the upper right corner.
Select the Target Space
Use the "Space" dropdown to change which space the project will be created in.
Projects must belong to a space to enable team collaboration.
Choose a Creation Method
Select from three creation methods (details below):
- Upload Excel, CSV, or Jupyter Notebook files
- Create from an external Connector
- Import from GitHub repository
Creation Methods
Upload Excel, CSV, or Jupyter Notebook Files
Create dashboards from your data files. After upload, the editor opens for data visualization and interactive dashboard building.
Supported Formats:
- Excel (.xlsx, .xls)
- CSV (.csv)
- Jupyter Notebook (.ipynb)
Steps:
- Upload your file as a Connector during project creation
- Enter project details (name and additional information), then create the project
- The editor launches and stores uploaded data in Squadbase DB via chat
- Edit in the editor once processing completes
Create from External Connector
For Connector setup methods, see the Connectors page.
Import from GitHub Repository
Create a project by importing an existing GitHub repository.
GitHub integration must be completed first. See the GitHub Integration page for details.
Prerequisites:
- GitHub account integration required
- Access permission to the target repository
Steps:
- Select "Developer Options" during project creation
- Select your GitHub Organization
- Choose the repository and branch to import, enter project name and domain
- Click "Create & Deploy" to create the project
Member Access
When creating a project, the following access rules apply:
- Automatic Access: All space members automatically gain access to the project
- Permission Level: Access level is determined by Organization Role (Admin, Creator, Viewer)
- Additional Members: After project creation, members outside the space can be invited individually
Viewing and Managing Projects
Project List
Projects are displayed as cards in the space details screen.
Card Display Content:
- Preview Image: Screenshot of the project
- Project Name: Name of the project
- Last Updated: Displayed as "Last updated XX hours ago"
- Open App Button: Opens the published application
- Grayed out (disabled) if not published
- Open Editor Button: Opens the Editor
- Pin Button: Pin the project for quick access
- Pinned projects appear in the left sidebar for quick access
- To unpin, select "Unpin project" from the same menu
- Duplicate Button: Duplicate the project
- When duplicating, the following are copied:
- Source code
- System environment and environment variables
- Data sources
- Squadbase DB (schema information)
- When duplicating, the following are copied:
Project Details Screen
Click the project name to view the details screen.
Header Section
- Member Avatars: Icons of members with access are displayed
- Open App: Opens the deployed app
- Open Editor: Opens the code editor
- Tab Navigation: Switch between 6 tabs for different functions
Project Tab
Displays project overview and latest information.
Repository
Display Items:
- Repository Type: Shows whether using Squadbase's default GitHub settings or your own connected GitHub account
- Branch: Main is set by default
Deployment (Latest Deployment)
View the latest deployment status.
Display Items:
- Status: Ready, Error, etc.
- Environment: Production, Preview, etc.
- Commit Hash: Version of the deployed code
- Current Badge: Currently published deployment
- Commit Message: Description of changes
- Deploy Time and Executor: When and who deployed
Analytics
Analyze application access patterns.
Features:
- Period Selection: Choose periods such as weekly
- Page Views Graph: Visualize daily access counts
For details, see User Analytics.
Comments
Collect feedback within your team.
Categories:
- Feedback: General feedback and impressions
- Bug Report: Bug and issue reports
- Feature Request: New feature proposals
- Question: Questions and confirmations
- Note: Notes and documentation
Actions:
- Create new comments using the "New Comment" button
Deployment Management
Deployments Tab
Manage project deployment (publishing) history.
Screen Layout:
- Environment Filter: Filter by "All Environments" or specific environment
- Create Deployment +: Create a new deployment
- Deployment List: Displayed in table format
List Display Content:
| Item | Description |
|---|---|
| Commit Hash | Version of deployed code |
| Current Badge | Currently published deployment |
| Environment | Production, Preview, etc. |
| Status | Ready, Error, etc. |
| Deploy Time | Build time + elapsed time |
| Commit Message | Description of changes |
| Deploy Date/Time | When deployment was executed |
| Deploy Executor | User who executed deployment |
| View Details | Display deployment details |
Actions:
- View Details: Check deployment details
- Pagination: Browse history across multiple pages
Log Monitoring and Management
Logs Tab
View project runtime logs and access logs. Use for error troubleshooting, application behavior verification, and security monitoring.
Access: Project Details Screen > Logs Tab
Log Types
-
Runtime Logs
- Application operation logs (Error / Warning / Info / Debug, etc.)
- Use cases: Error investigation, behavior verification, identifying performance issues
-
Access Logs
- HTTP request logs (URL / Method / Status / Response time / Client IP, etc.)
- Use cases: Access analysis, identifying 404/500 errors, security monitoring
Filters & Search
- Time Range: 10m / 30m / 1h / 3h / 1d / Custom range (specify start and end)
- Environment: Switch between Production / Preview
- Timezone: Select display timezone (e.g., Local Timezone)
- Search: Filter by keyword (e.g., "Error", "404", "database")
For more details, see Log Monitoring.
Usage Analytics
Analytics Tab
Analyze user access to your project. Visualize access patterns to the Production environment and understand application usage.
Access: Project Details Screen > Analytics Tab
Capabilities
- View page views in daily graphs
- Period selection (Weekly / Monthly, etc.)
- Sorting (e.g., Most Active)
Interpretation & Application
- Monitor access increases after dashboard updates
- Investigate sudden access drops using Logs
Important: Only Production environment is tracked (Preview environment access is not included)
For more details, see User Analytics.
Member Management
Members Tab
Manage project members and their permissions.
Screen Layout:
- Invite Member Button: Invite new members
- Project Role Description: Information about project roles
- Member List: Displayed in three sections
Organization Admins
Organization-level administrators are displayed.
Display Content:
- Avatar
- Username
- Organization Role: Admin
- "Full access to all projects" display
- "Full Control" badge
Characteristics:
- Has full access to all projects
- No individual invitation needed
Space Members
Members accessing the project through space membership.
Display Content:
- Avatar
- Username
- Organization Role: Creator, Viewer
- "via Space: [Space Name]" display
- Access Level:
- Deploy & View: Can deploy and view (Creator)
- View Only: View only (Viewer)
- Action menu (...)
Characteristics:
- Automatic access for space members
- Permissions based on Organization Role
Shared Members
Members with access to only this specific project.
Display Content:
- Avatar
- Username
- Organization Role: Creator, Viewer
- "Shared direct invitation" display
- Access Level:
- Deploy & View: Can deploy and view (Creator)
- View Only: View only (Viewer)
- Action menu (...)
Characteristics:
- Cannot access projects in other spaces
Settings
Settings Tab
Manage detailed project settings.
Overview Settings
Edit basic project information.
Editable Items:
- Project Name: Change the project name
- Space: Change the space the project belongs to
- Save Button: Save changes
Read-only Information:
- Project ID: Unique identifier for the project (copyable)
Danger Zone
Section for critical changes and delete operations.
Delete Project
This action is irreversible! Deletion permanently removes all deployments, logs, and settings.
- Click "Delete Project" button to delete
Tips & FAQ
Q: What's the relationship between projects and spaces?
A: Projects must belong to a Space. Space members automatically have access to all projects, making team collaboration seamless.
Q: Can I change the GitHub repository later?
A: Yes. Click the "..." button in the editor, enable developer mode, then go to Settings > Connect to GitHub Repository.
Q: How do I create a deployment?
A: Use the "Create Deployment +" button in the Deployments tab, or click "Publish to Team" in the Editor.
Q: How do I add project members individually?
A: Use the "Invite Member" button in the Members tab to invite members from outside the space.
Best Practices
- Use Pin Feature: Pin frequently used projects for faster access
- Collaborate with Comments: Share bug reports and feature requests through comments to enhance team communication
- Review Deployment History: When issues occur, check the Deployments tab to identify when problems started
- Leverage Logs: Actively use Log Monitoring to identify root causes of issues
Summary
Projects are the powerful central feature for application development. Manage everything from creation to deployment and analytics in one place. Integration with Spaces enables efficient team development.
Key Features:
- Unified project management
- Flexible deployment management
- Team collaboration
- Detailed access control
- User analytics and log monitoring
For more detailed information, refer to the dedicated documentation for each feature (User Analytics, Logs, etc.).